Showing posts with label On the CHEAP. Show all posts

March 27, 2013

"Good Morning Mr. Sun, I'm making Seed Matts Today!"

Early Mornin' Sun
A late March sunrise came beaming down upon the fields this morning. It was a very cold 21 degrees at 7a.m. when I opened the door to greet the day. Finally, I felt the warmth of the sun on my face. I gave thanks for the hope of spring destined to arrive, eventually.

The chickens, rooster and turkeys were already out in their run.  Happy in the sunshine while prancing and squawking about.  Maybe later today they can be let to roam. Poor things. They are tired of the winter too.

Over to the barn is the next stop in my routine. Billy and Chloe Goat were sunning themselves as they lay on their beds of straw. A wonderful sight to watch the sunbeams dance with clouds of straw dust peeking through the barn walls.

We've been filling our extended snowed in springtime with preparing indoors with some old and new gardening ideas. The latest is a simple seed mat you can make yourself, CHEAP!
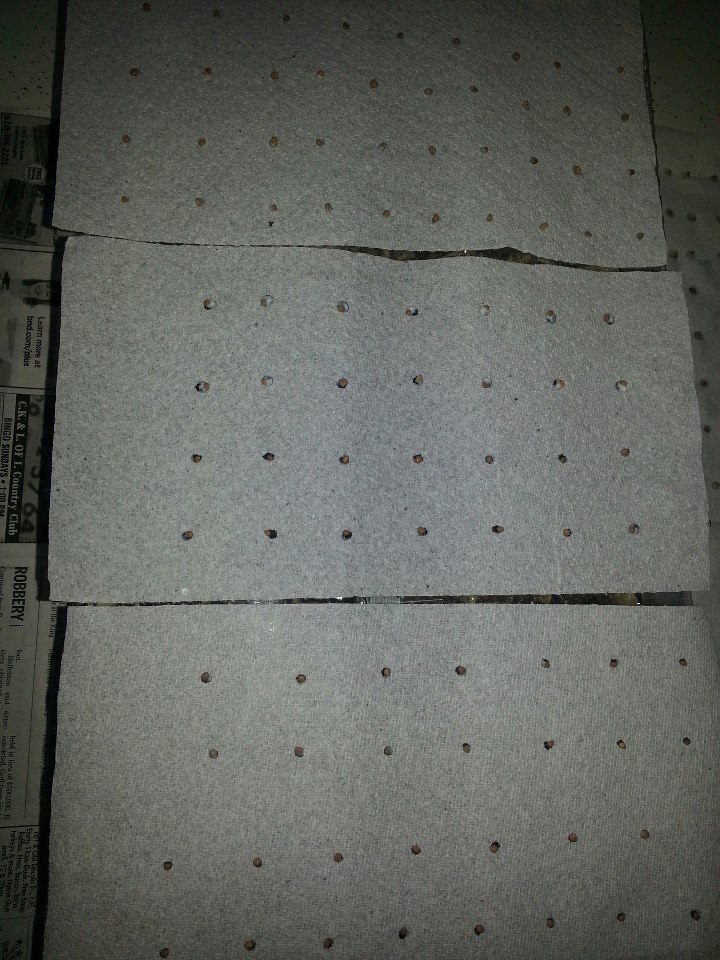
Homemade Seed Mats
Sitting at my computer bored stiff as bored stiff can be. I was eagerly longing to get outside and play in the dirt. A friend posted it on Facebook.

This is so easy! All you need are glue, seeds and cheap napkins (we used 2ply paper towels & just separated them).

                                            Happy Matting!!


February 22, 2013

Hand Sanitizer ~ Make Your Own

ALOE ~ LAVENDER ~ TEA TREE
Unlike store brands this is healthy and safe for you and your family. 

You can whip this up at home in 5 minutes!

 It's cheaper and you know what goes into it!

This is an all natural gel that kills germs, unlike the chemical based versions. 

Plus there's a big difference in the cost of making it yourself verses store bought.

Ingredients:
  • 6 drops Tea Tree
  • 6 drops lavender
  • 1 ounce Aloe Vera gel for a base

First add the essential oils to the bottle. Then add the Aloe. Roll bottle gently to mix the oils. Pour onto hands and rub.

Note ~ Make a big batch and store it in a cool dry place. Then when I need it all I do is fill my smaller bottles.


February 18, 2013

Simple DIY Shampoo & Conditioner


My Sexy HairCare Bottles!
Nope they aren’t pretty but that's not what it's about. It’s about me, not what some corporation tells me I am about & what I want & what I need only to earn higher profits. That's why television is on my "sucks" list. When I first decided that simple living was for me I Google'd and Google'd some more. Before long my head was so swollen with info I couldn't think no more. I had to step back and look at the situation. After a while I remembered seeing a couple really simple recipes for shampoo and conditioner. My idea was to start with the simplest, least expensive ingredients first. If it works and I like it, great! If not, I move on up to the next least expensive until I find something that is for me. Well, I liked these. My hair feels cleaner, softer, less weighted down. And I like them even more as I pass by the hair care products at stores. Smiling all the way hearing a little more change in my pocket going,       Jingle - Lingle - Ling!  

Here are the ingredients. 
Baking Soda ~ Water ~ Apple Cider Vinegar
When I first made this I used old shampoo and conditioner bottles. Hesitant about putting it on my head I was and should have been...As I tipped the bottles it flooded out right down into my eyes and let me tell you it burns like wildfire! 
 I had decided a smaller exit hole would be better. So, I went out and bought two condiment bottles @ 99 cents a piece. from the kitchen department in a department store. When I shook them they leaked badly around the rim. Then I went to a restaurant supply store to buy a better quality container.  
remember, I always start with the cheaper at times to my downfall!!
These were $1.79 w/o caps. They are 16 oz. each. Plus, I purchased two "O" rings at the hardware store to put inside the rims of the bottles to keep them from leaking. These have a spot the "o" rings fit down into well. They're black and you can kinda see them in the top pic.
Here's what you do...
In a bottle put 1/4 cup baking soda, fill with water and shake. (baking soda does not dessolve!)
In the other bottle use 1 part vinegar to 2 parts water, shake to mix.
That's it! You now have your first batch of homemade shampoo & conditioner! 
How much you use will depend on you and your needs. I use about 8oz. each time.
Mine are LOST IN SPACE fans!

 "OOPS!" I forgot about buying caps for them. So, I used the tops from the cheaper ones for now. Next time I'm at the hardware store I'll see what I can find to use as caps.
There are other recipes out there using herbs. I plan on trying some. When I do I'll let ya'll know!
Happy Mixing! 


July 28, 2012

Homemade Liquid Laundry Detergent

      
4  Cups hot tap water
1  Fels Naptha soap bar
1 Cup Arm and Hammer Washing Soda                       
1/2 Cup Borax
5 gallon bucket with lid                                         
Large paddle for stirring  (I use a piece of an old wooden broom handle)


Grate bar of Fels Naptha and add to water in sauce pan. Stir continually over medium-low heat until soap dissolves and is melted.

Fill a 5 gallon bucket half full of hot tap water. Add melted soap, washing soda and Borax. Stir well until all powder is dissolved.

Fill bucket to top with hot tap water. Stir, cover and let sit over night. It will thicken.

Stir then fill a used, clean, laundry soap container half full with water and then fill rest of way up the soap mixture. Shake before each use.

Yield: Liquid soap recipe makes 10 gallons.

Top Load Machine ~ 3/4 to 1 cup per load Approx. 170 loads

Front Load Machines ~ ¼ Cup per load Approx. 640 loads

You might like...